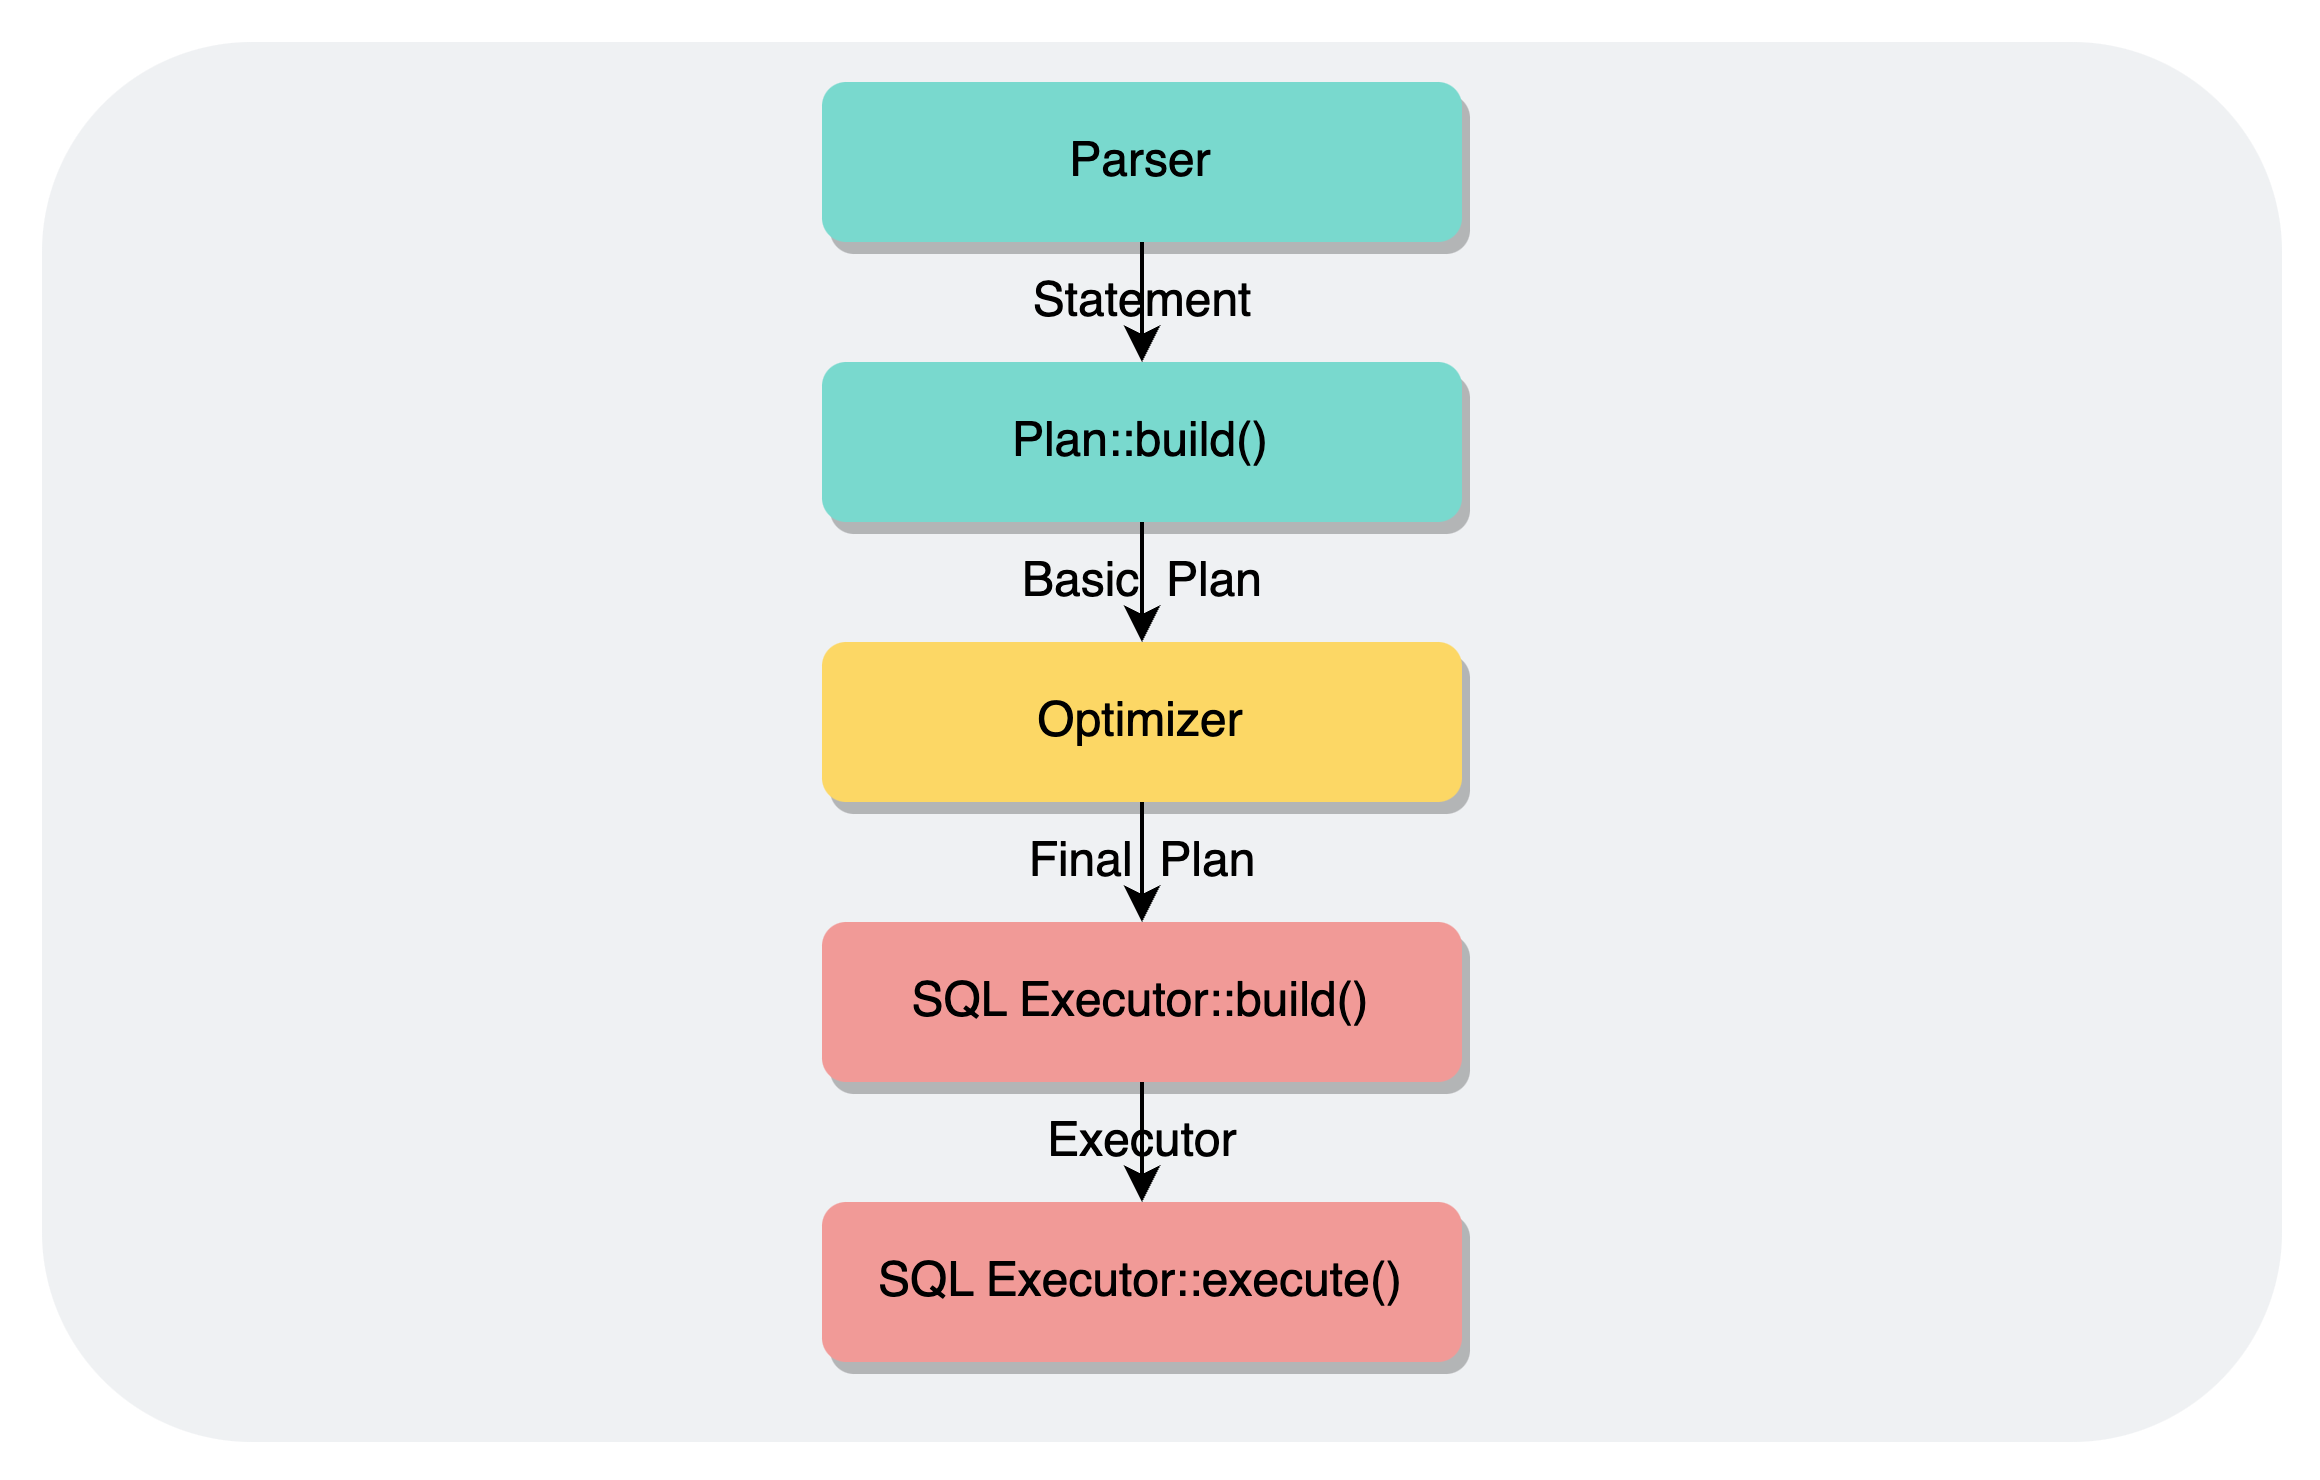
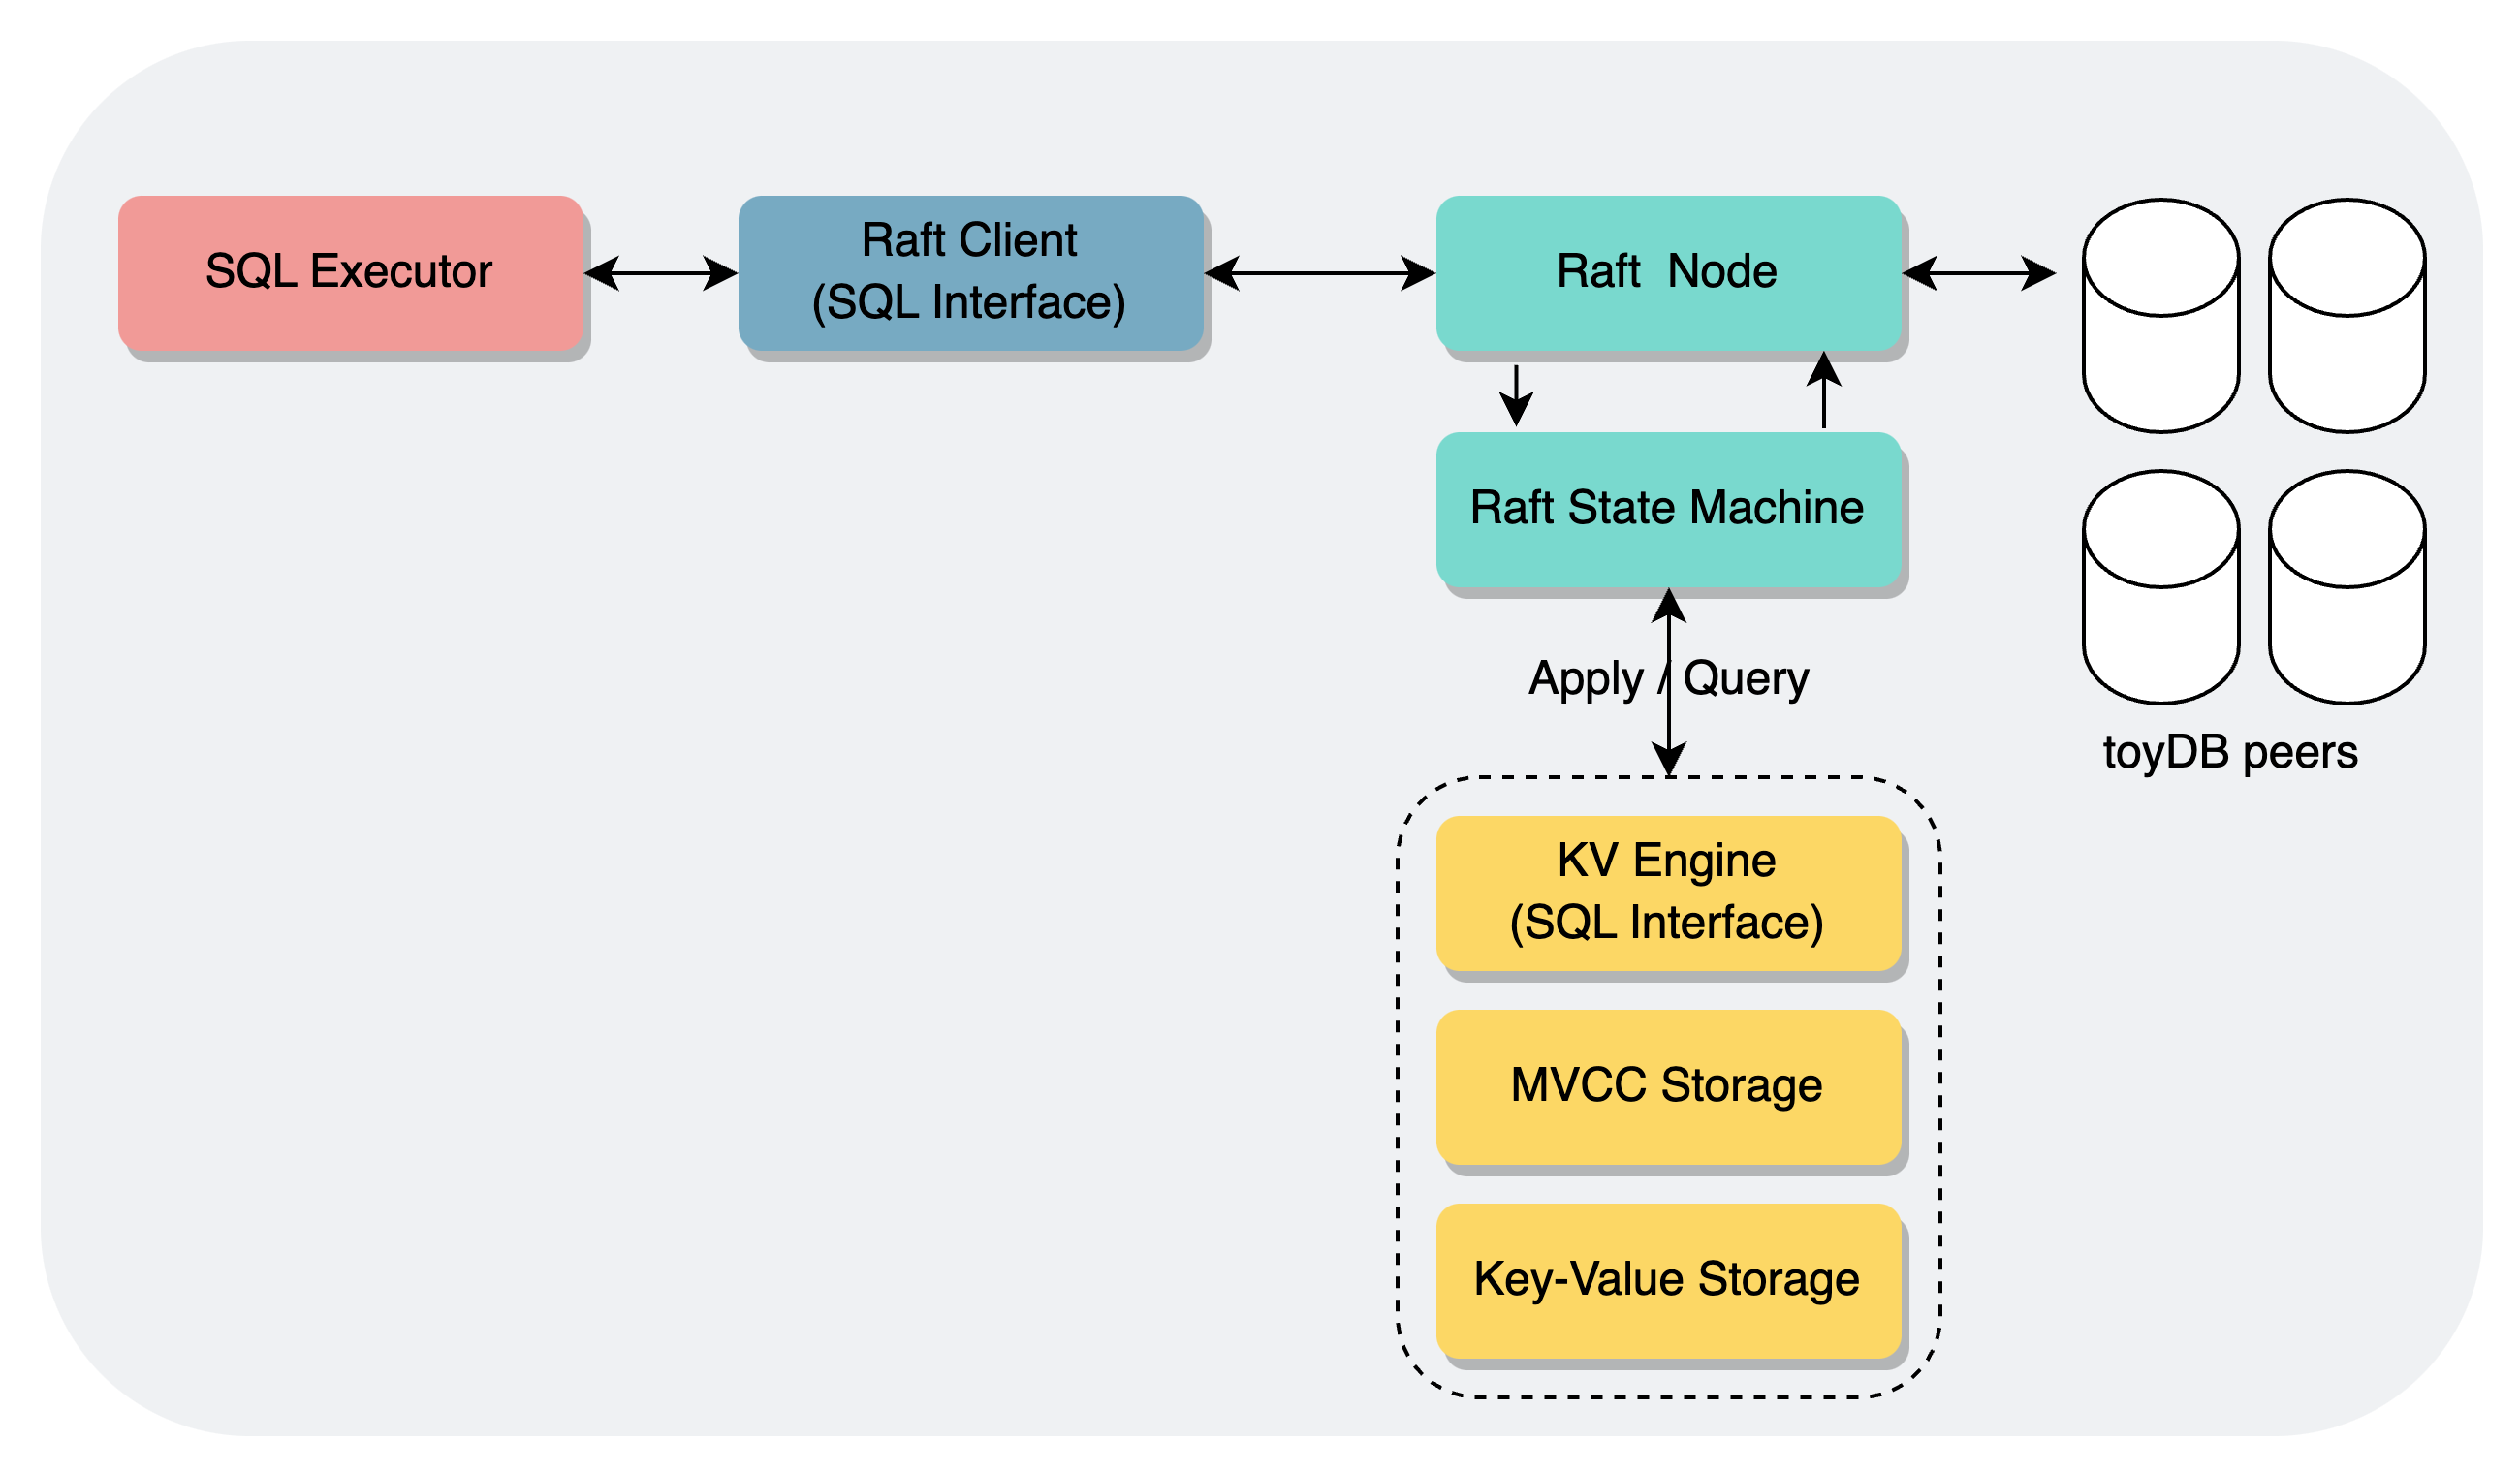
本系列的第一章00-Architecture以SQL执行流程为整个系列做了一个引子,目前本系列通过六篇文章,已经将toydb的各个模块都分析完毕,在本章中,不妨在了解了各个模块的基础上,补全SQL执行的全流程,为整个系列收尾。
笔者会先补全Schema部分,介绍一下在toydb中如何构建起关系模型,之后是SQL执行的全流程,大致可以分为两部分:
- 一是在SQL层中,完成Parse -> Optimize -> Execute的过程
- 二是在SQL Engine中,完成分布式 + 存储的过程
由于调用链比较长,并且每一步都会处理多种类型,从而代码量非常庞大,如果一味全部复制粘贴的话会导致逻辑非常不连贯,观感非常不好,因此在这一章当中,对于近似类型的处理,笔者只会保留其中的几个,如果想了解全部实现的话,还请读者自行拉取源码阅读。
Schema#
数据类型#
toydb中提供了四种数据类型的支持,分别是Boolean、Integer、Float、String,定义在src/sql/types/mod.rs中:
1
2
3
4
5
6
7
8
| /// A datatype
#[derive(Clone, Debug, Hash, PartialEq, Serialize, Deserialize)]
pub enum DataType {
Boolean,
Integer,
Float,
String,
}
|
Value使用一个enum来实现,表示不同类型的值,除了上面的四种数据类型,还允许值为Null,然后提供了一些hash和数据类型转换的支持:
1
2
3
4
5
6
7
8
9
| /// A specific value of a data type
#[derive(Clone, Debug, PartialEq, Serialize, Deserialize)]
pub enum Value {
Null,
Boolean(bool),
Integer(i64),
Float(f64),
String(String),
}
|
toydb的Schema非常简单,只有两级,分别是table和column,定义在src/schema.rs当中,而Row只是一个Vec<Value>,没有封装其他逻辑。
Table#
由于底层toydb采用的是kv存储,不需要在Table当中定义存储的行为,Table的结构和实现
都非常简洁,结构体中只有两个字段,分别用于表示表名和包含的字段,然后定义了一个迭代器,表示多个Table,用于扫描当前所有的Table:
1
2
3
4
5
6
7
8
9
| /// A table scan iterator
pub type Tables = Box<dyn DoubleEndedIterator<Item = Table> + Send>;
/// A table schema
#[derive(Clone, Debug, PartialEq, Deserialize, Serialize)]
pub struct Table {
pub name: String,
pub columns: Vec<Column>,
}
|
| 方法 | 功能 |
|---|
| pub fn get_column(&self, name: &str) | 根据名称获取列 |
| pub fn get_column_index(&self, name: &str) | 根据名称获取列索引 |
| pub fn get_primary_key(&self) | 获取主键的列 |
| pub fn get_row_key(&self, row: &[Value]) | 获取一行中主键的值 |
| pub fn validate(&self, txn: &mut dyn Transaction) | 验证表结构 |
| pub fn validate_row(&self, row: &[Value], txn: &mut dyn Transaction) | 验证行结构 |
各个方法的实现逻辑都很简单:
 1
 2
 3
 4
 5
 6
 7
 8
 9
10
11
12
13
14
15
16
17
18
19
20
21
22
23
24
25
26
27
28
29
30
31
32
33
34
35
36
37
38
39
40
41
42
43
44
45
46
47
48
49
50
51
52
53
54
55
56
57
58
59
60
61
62
63
64
65
66
67
68
69
| impl Table {
/// Creates a new table schema
pub fn new(name: String, columns: Vec<Column>) -> Result<Self> {
let table = Self { name, columns };
Ok(table)
}
/// Fetches a column by name
pub fn get_column(&self, name: &str) -> Result<&Column> {
self.columns.iter().find(|c| c.name == name).ok_or_else(|| {
Error::Value(format!("Column {} not found in table {}", name, self.name))
})
}
/// Fetches a column index by name
pub fn get_column_index(&self, name: &str) -> Result<usize> {
self.columns.iter().position(|c| c.name == name).ok_or_else(|| {
Error::Value(format!("Column {} not found in table {}", name, self.name))
})
}
/// Returns the primary key column of the table
pub fn get_primary_key(&self) -> Result<&Column> {
self.columns
.iter()
.find(|c| c.primary_key)
.ok_or_else(|| Error::Value(format!("Primary key not found in table {}", self.name)))
}
/// Returns the primary key value of a row
pub fn get_row_key(&self, row: &[Value]) -> Result<Value> {
row.get(
self.columns
.iter()
.position(|c| c.primary_key)
.ok_or_else(|| Error::Value("Primary key not found".into()))?,
)
.cloned()
.ok_or_else(|| Error::Value("Primary key value not found for row".into()))
}
/// Validates the table schema
pub fn validate(&self, txn: &mut dyn Transaction) -> Result<()> {
if self.columns.is_empty() {
return Err(Error::Value(format!("Table {} has no columns", self.name)));
}
match self.columns.iter().filter(|c| c.primary_key).count() {
1 => {}
0 => return Err(Error::Value(format!("No primary key in table {}", self.name))),
_ => return Err(Error::Value(format!("Multiple primary keys in table {}", self.name))),
};
for column in &self.columns {
column.validate(self, txn)?;
}
Ok(())
}
/// Validates a row
pub fn validate_row(&self, row: &[Value], txn: &mut dyn Transaction) -> Result<()> {
if row.len() != self.columns.len() {
return Err(Error::Value(format!("Invalid row size for table {}", self.name)));
}
let pk = self.get_row_key(row)?;
for (column, value) in self.columns.iter().zip(row.iter()) {
column.validate_value(self, &pk, value, txn)?;
}
Ok(())
}
}
|
Column#
Column同样很简洁,定义如下,均以给出注释:
 1
 2
 3
 4
 5
 6
 7
 8
 9
10
11
12
13
14
15
16
17
18
19
20
| /// A table column schema
#[derive(Clone, Debug, PartialEq, Deserialize, Serialize)]
pub struct Column {
/// Column name
pub name: String,
/// Column datatype
pub datatype: DataType,
/// Whether the column is a primary key
pub primary_key: bool,
/// Whether the column allows null values
pub nullable: bool,
/// The default value of the column
pub default: Option<Value>,
/// Whether the column should only take unique values
pub unique: bool,
/// The table which is referenced by this foreign key
pub references: Option<String>,
/// Whether the column should be indexed
pub index: bool,
}
|
在column当中,定义了validate和validate_column分别验证列和列当中的值是否合法:
在validate中做了如下检查:
- 主键不能设置为null
- 主键必须是唯一的,其中的值不允许重复,因为要用于生成key来存储
- 验证默认值:默认值的类型必须与column的类型相同;不允许将null设置为非null column的默认值;允许为null的column必须设置默认值。
- 检查外键引用
 1
 2
 3
 4
 5
 6
 7
 8
 9
10
11
12
13
14
15
16
17
18
19
20
21
22
23
24
25
26
27
28
29
30
31
32
33
34
35
36
37
38
39
40
41
42
43
44
45
46
47
48
49
50
51
52
53
54
55
56
57
| /// Validates the column schema
pub fn validate(&self, table: &Table, txn: &mut dyn Transaction) -> Result<()> {
// Validate primary key
if self.primary_key && self.nullable {
return Err(Error::Value(format!("Primary key {} cannot be nullable", self.name)));
}
if self.primary_key && !self.unique {
return Err(Error::Value(format!("Primary key {} must be unique", self.name)));
}
// Validate default value
if let Some(default) = &self.default {
if let Some(datatype) = default.datatype() {
if datatype != self.datatype {
return Err(Error::Value(format!(
"Default value for column {} has datatype {}, must be {}",
self.name, datatype, self.datatype
)));
}
} else if !self.nullable {
return Err(Error::Value(format!(
"Can't use NULL as default value for non-nullable column {}",
self.name
)));
}
} else if self.nullable {
return Err(Error::Value(format!(
"Nullable column {} must have a default value",
self.name
)));
}
// Validate references
if let Some(reference) = &self.references {
let target = if reference == &table.name {
table.clone()
} else if let Some(table) = txn.read_table(reference)? {
table
} else {
return Err(Error::Value(format!(
"Table {} referenced by column {} does not exist",
reference, self.name
)));
};
if self.datatype != target.get_primary_key()?.datatype {
return Err(Error::Value(format!(
"Can't reference {} primary key of table {} from {} column {}",
target.get_primary_key()?.datatype,
target.name,
self.datatype,
self.name
)));
}
}
Ok(())
}
|
在validate_value中做了如下检查:
- 检验数据类型是否与column的数据类型匹配
- String类型不能过长,最大为1024个字节
- 检查外键
- 检查unique,处理方法是全表遍历检测是否有相同的值
 1
 2
 3
 4
 5
 6
 7
 8
 9
10
11
12
13
14
15
16
17
18
19
20
21
22
23
24
25
26
27
28
29
30
31
32
33
34
35
36
37
38
39
40
41
42
43
44
45
46
47
48
49
50
51
52
53
54
55
56
57
58
59
| /// Validates a column value
pub fn validate_value(
&self,
table: &Table,
pk: &Value,
value: &Value,
txn: &mut dyn Transaction,
) -> Result<()> {
// Validate datatype
match value.datatype() {
None if self.nullable => Ok(()),
None => Err(Error::Value(format!("NULL value not allowed for column {}", self.name))),
Some(ref datatype) if datatype != &self.datatype => Err(Error::Value(format!(
"Invalid datatype {} for {} column {}",
datatype, self.datatype, self.name
))),
_ => Ok(()),
}?;
// Validate value
match value {
Value::String(s) if s.len() > 1024 => {
Err(Error::Value("Strings cannot be more than 1024 bytes".into()))
}
_ => Ok(()),
}?;
// Validate outgoing references
if let Some(target) = &self.references {
match value {
Value::Null => Ok(()),
Value::Float(f) if f.is_nan() => Ok(()),
v if target == &table.name && v == pk => Ok(()),
v if txn.read(target, v)?.is_none() => Err(Error::Value(format!(
"Referenced primary key {} in table {} does not exist",
v, target,
))),
_ => Ok(()),
}?;
}
// Validate uniqueness constraints
if self.unique && !self.primary_key && value != &Value::Null {
let index = table.get_column_index(&self.name)?;
let mut scan = txn.scan(&table.name, None)?;
while let Some(row) = scan.next().transpose()? {
if row.get(index).unwrap_or(&Value::Null) == value
&& &table.get_row_key(&row)? != pk
{
return Err(Error::Value(format!(
"Unique value {} already exists for column {}",
value, self.name
)));
}
}
}
Ok(())
}
|
初始化#
在main函数当中,会调用serve启动服务:
- 在
serve当中会首先创建一个sql_engine,这里可以看到,sql_engine对应的是sql::engine::Raft,这也是SQL Engine的入口,executor会首先将命令发送给Raft - 调用
raft.serve()启动Raft,创建用于节点之间交互的tcp sender和receiver,创建一个eventloop处理Message,eventloop如何处理Message,在上一章中已经介绍过。 - 调用
serve_sql()启动server,处理client发送而来的请求。
 1
 2
 3
 4
 5
 6
 7
 8
 9
10
11
12
13
14
15
16
17
18
19
20
21
22
23
24
25
26
27
28
29
30
31
32
33
34
35
36
37
38
39
40
41
42
43
44
45
46
47
48
49
50
51
52
53
54
55
56
57
58
| /// Serves Raft and SQL requests until the returned future is dropped. Consumes the server.
pub async fn serve(self) -> Result<()> {
let sql_listener = self
.sql_listener
.ok_or_else(|| Error::Internal("Must listen before serving".into()))?;
let raft_listener = self
.raft_listener
.ok_or_else(|| Error::Internal("Must listen before serving".into()))?;
let (raft_tx, raft_rx) = mpsc::unbounded_channel();
let sql_engine = sql::engine::Raft::new(raft_tx);
// 分别启动Raft server和Sql server
tokio::try_join!(
self.raft.serve(raft_listener, raft_rx),
Self::serve_sql(sql_listener, sql_engine),
)?;
Ok(())
}
pub async fn serve(
self,
listener: TcpListener,
client_rx: mpsc::UnboundedReceiver<(Request, oneshot::Sender<Result<Response>>)>,
) -> Result<()> {
let (tcp_in_tx, tcp_in_rx) = mpsc::unbounded_channel::<Message>();
let (tcp_out_tx, tcp_out_rx) = mpsc::unbounded_channel::<Message>();
let (task, tcp_receiver) = Self::tcp_receive(listener, tcp_in_tx).remote_handle();
tokio::spawn(task);
let (task, tcp_sender) = Self::tcp_send(self.peers, tcp_out_rx).remote_handle();
tokio::spawn(task);
let (task, eventloop) =
Self::eventloop(self.node, self.node_rx, client_rx, tcp_in_rx, tcp_out_tx)
.remote_handle();
tokio::spawn(task);
tokio::try_join!(tcp_receiver, tcp_sender, eventloop)?;
Ok(())
}
/// Serves SQL clients.
async fn serve_sql(listener: TcpListener, engine: sql::engine::Raft) -> Result<()> {
let mut listener = TcpListenerStream::new(listener);
while let Some(socket) = listener.try_next().await? {
// 处理单个请求
let peer = socket.peer_addr()?;
let session = Session::new(engine.clone())?;
tokio::spawn(async move {
info!("Client {} connected", peer);
match session.handle(socket).await {
Ok(()) => info!("Client {} disconnected", peer),
Err(err) => error!("Client {} error: {}", peer, err),
}
});
}
Ok(())
}
|
执行流程#
SQL执行#
SQL执行的入口在serve_sql()当中,从listener当中获取到单个请求之后,就会创建一个Session,然后把传下来的raft engine交给Session,一个Session用于负责一条SQL,在处理完网络连接之后,会调用到Session.execute()来从解析SQL的过程开始,执行一条SQL。
在execute中,会先使用Parser进行sql解析,然后根据生成的AST Statement去生成一个执行计划,然后再通过Optimizer进行优化,得到一个最终的执行计划,最后根据执行计划构建一个Executor,调用Executor的execute开始执行。
 1
 2
 3
 4
 5
 6
 7
 8
 9
10
11
12
13
14
15
16
17
18
19
20
21
22
23
24
25
26
| /// Executes a query, managing transaction status for the session
pub fn execute(&mut self, query: &str) -> Result<ResultSet> {
// FIXME We should match on self.txn as well, but get this error:
// error[E0009]: cannot bind by-move and by-ref in the same pattern
// ...which seems like an arbitrary compiler limitation
match Parser::new(query).parse()? {
ast::Statement::Begin { .. } if self.txn.is_some() => {
Err(Error::Value("Already in a transaction".into()))
}
// ...
// ...
statement => {
let mut txn = self.engine.begin()?;
match Plan::build(statement, &mut txn)?.optimize(&mut txn)?.execute(&mut txn) {
Ok(result) => {
txn.commit()?;
Ok(result)
}
Err(error) => {
txn.rollback()?;
Err(error)
}
}
}
}
}
|

Parser#
在toydb当中,通过Parser会生成一个Statement,对于parser如何解析sql的过程,由于笔者没有系统学过编译原理,也几乎不懂编译原理,这里就不分析了,感兴趣的读者可自行阅读,这一部分定义在src/parser下。
在Statement当中,包含了SQL执行所需要的所有信息,使用enum进行表示:
 1
 2
 3
 4
 5
 6
 7
 8
 9
10
11
12
13
14
15
16
17
18
| pub enum Statement {
Begin {
read_only: bool,
as_of: Option<u64>,
},
Commit,
Rollback,
Select {
select: Vec<(Expression, Option<String>)>,
from: Vec<FromItem>,
r#where: Option<Expression>,
group_by: Vec<Expression>,
having: Option<Expression>,
order: Vec<(Expression, Order)>,
offset: Option<Expression>,
limit: Option<Expression>,
},
}
|
Plan#
在拿到了Statement之后,就可以根据Statement去生成一个基础的执行计划了,toydb中没有区分逻辑计划和物理计划,只定义了plan和对应的plan node。Plan node是使用enum进行定义的,结构上与Executor是一一对应的。
Plan作为Plan Node的Wrapper,为其封装了一些方法:
build:根据Statement的类型,构建一个Plan Nodeoptimize:对plan进行优化生成一个最终的执行计划,execute:执行一个plan,会先根据自身的Plan Node去创建一个Executor,然后会调用到Executor的execute
在optimize当中,共涉及到了五种类型的优化:
ConstantFolder:提前计算一些常量表达式,如 where a > 5 - 3优化为where a > 2。FilterPushdown:谓词下推,为了让底层算子尽可能多的过滤数据,从而减少上层的计算量IndexLookup:如果当前Table上要查询的column存在索引,就将TableScan转换为IndexScanNoopCleaner:Noop意味No Operation,在这一部分清除掉一些没有意义的Node和Filter,例如where 1 = 1这类恒为true的JoinType:优化Join类型,目前会将NestedLoopJoin优化为HashJoin。
build和execute都会返回一个Self,从而进行链式调用,按照build -> optimize -> execute的流程来执行。
 1
 2
 3
 4
 5
 6
 7
 8
 9
10
11
12
13
14
15
16
17
18
19
20
21
22
23
24
25
26
27
28
29
30
31
32
33
34
35
36
37
38
39
40
41
42
43
44
45
46
47
48
49
50
51
52
53
54
55
| /// A plan node
#[derive(Debug, PartialEq, Serialize, Deserialize)]
pub enum Node {
Aggregation {
source: Box<Node>,
aggregates: Vec<Aggregate>,
},
HashJoin {
left: Box<Node>,
left_field: (usize, Option<(Option<String>, String)>),
right: Box<Node>,
right_field: (usize, Option<(Option<String>, String)>),
outer: bool,
},
// ...
// ...
NestedLoopJoin {
left: Box<Node>,
left_size: usize,
right: Box<Node>,
predicate: Option<Expression>,
outer: bool,
Update {
table: String,
source: Box<Node>,
expressions: Vec<(usize, Option<String>, Expression)>,
},
}
pub struct Plan(pub Node);
impl Plan {
/// Builds a plan from an AST statement.
pub fn build<C: Catalog>(statement: ast::Statement, catalog: &mut C) -> Result<Self> {
Planner::new(catalog).build(statement)
}
/// Executes the plan, consuming it.
pub fn execute<T: Transaction + 'static>(self, txn: &mut T) -> Result<ResultSet> {
<dyn Executor<T>>::build(self.0).execute(txn)
}
/// Optimizes the plan, consuming it.
pub fn optimize<C: Catalog>(self, catalog: &mut C) -> Result<Self> {
let mut root = self.0;
root = optimizer::ConstantFolder.optimize(root)?;
root = optimizer::FilterPushdown.optimize(root)?;
root = optimizer::IndexLookup::new(catalog).optimize(root)?;
root = optimizer::NoopCleaner.optimize(root)?;
root = optimizer::JoinType.optimize(root)?;
Ok(Plan(root))
}
}
|
Executor#
在执行这一部分,toydb定义了一个trait,其中只有execute一个方法,只要实现了这个trait,就可以作为Executor被调用。
1
2
3
4
| pub trait Executor<T: Transaction> {
/// Executes the executor, consuming it and returning a result set
fn execute(self: Box<Self>, txn: &mut T) -> Result<ResultSet>;
}
|
 1
 2
 3
 4
 5
 6
 7
 8
 9
10
11
12
13
14
15
16
17
18
19
20
21
22
23
24
25
| pub struct Insert {
table: String,
columns: Vec<String>,
rows: Vec<Vec<Expression>>,
}
impl<T: Transaction> Executor<T> for Insert {
fn execute(self: Box<Self>, txn: &mut T) -> Result<ResultSet> {
let table = txn.must_read_table(&self.table)?;
let mut count = 0;
for expressions in self.rows {
let mut row =
expressions.into_iter().map(|expr| expr.evaluate(None)).collect::<Result<_>>()?;
if self.columns.is_empty() {
row = Self::pad_row(&table, row)?;
} else {
row = Self::make_row(&table, &self.columns, row)?;
}
txn.create(&table.name, row)?;
count += 1;
}
Ok(ResultSet::Create { count })
}
}
|
以Insert为例,首先定义一个Insert结构体,然后为Insert实现Executor trait。后续就是利用SQL Engine来先共识后存储了。
SQL Engine#

Read#
这里继续以Insert为例,走完SQL Engine的整个流程。Insert中需要先读取到对应的Table,之后再添加多条Row,分为一次读请求和多次写请求,刚好可以用来分析读写请求的执行流程。
 Insert时需要首先读取到对应的Table,这里就会调用SQL Engine的
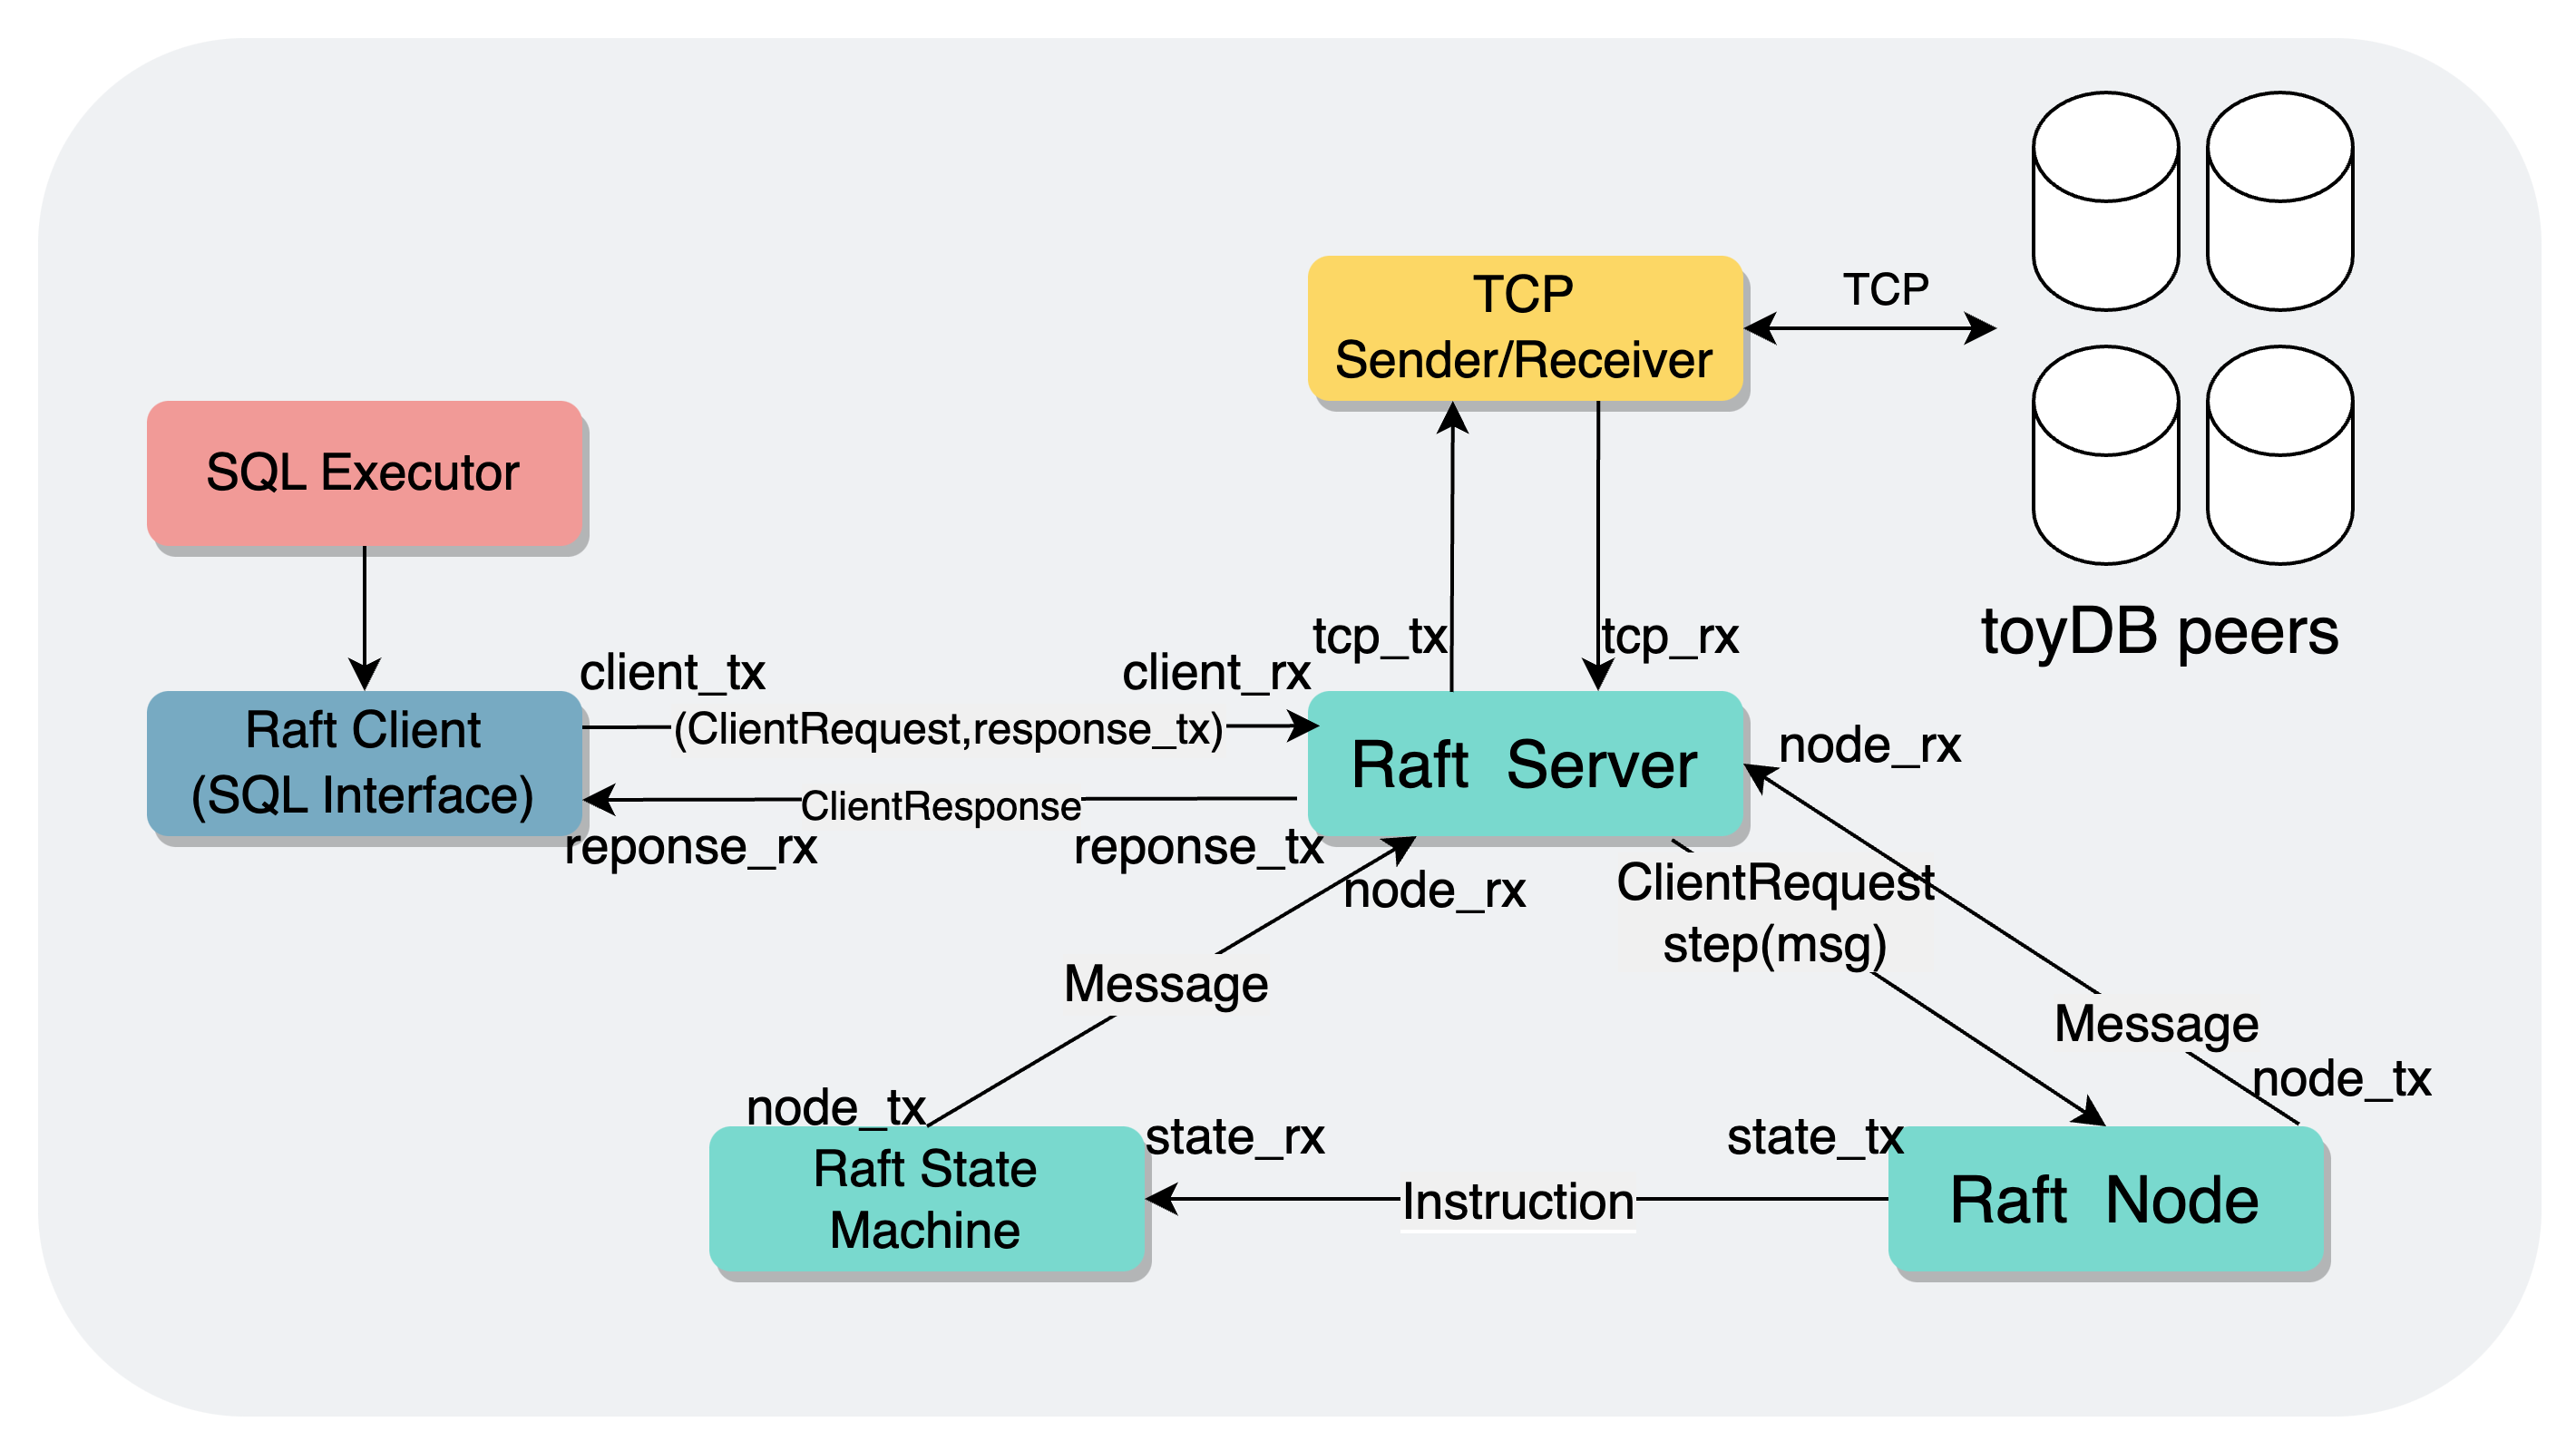
txn.must_read_table(),在该函数内,最终会调用到sql::engine::raft::Transaction的read_table(),在这里,会通过Raft Client向Raft Server去发送一条类型为Query::ReadTable的请求。
self.client.query(),会调用到execute()。在execute()当中,会调用oneshot::channel()创建一个一次性的channel,将channel的消息发送端response_tx和request一同发送给Raft Server。
之后,Client就会监听这个channel,获取Server端发送回来了执行结果,Server接收并执行完之后,会使用传过去的发送端再将响应发送回来,Client等待从接收端获取消息,拿到Raft Server对request的执行结果向上返回。此时,创建的oneshot channel就可以销毁了。
 1
 2
 3
 4
 5
 6
 7
 8
 9
10
11
12
13
14
15
16
17
18
19
20
|
    // (1)
    fn read_table(&self, table: &str) -> Result<Option<Table>> {
        self.client.query(Query::ReadTable { txn: self.state.clone(), table: table.to_string() })
    }
    // (2)
        /// Queries the Raft state machine, deserializing the response into the
    /// return type.
    fn query<V: DeserializeOwned>(&self, query: Query) -> Result<V> {
        match self.execute(raft::Request::Query(bincode::serialize(&query)?))? {
            raft::Response::Query(response) => Ok(bincode::deserialize(&response)?),
            resp => Err(Error::Internal(format!("Unexpected Raft query response {:?}", resp))),
        }
    }
	// (3)
	fn execute(&self, request: raft::Request) -> Result<raft::Response> {
	let (response_tx, response_rx) = oneshot::channel();
	self.tx.send((request, response_tx))?;
	futures::executor::block_on(response_rx)?
}
|
Server端的接收逻辑就在server的eventloop当中,从client_rx(上面传来的raft_rx)接收到Client发送的request和response_tx。
请求需要先通过Raft完成共识,通过step()将Message交给Leader(通常是Leader,如果不是Leader也会转发给Leader,后面全部假设请求发送给了Leader),之后Apply了才能够执行,这里先使用一个HashMap保存请求,等到Apply并执行完之后再从HashMap中获取出暂存的response_rx,响应Client。
 1
 2
 3
 4
 5
 6
 7
 8
 9
10
11
12
13
| // 获取client发送的消息,交给Raft模块去处理,这里的client并不是用户的client,而是要执行命令的sql端
// 暂存命令,等到日志Apply并执行完之后再响应客户端
Some((request, response_tx)) = client_rx.next() => {
let id = Uuid::new_v4().as_bytes().to_vec();
let msg = Message{
from: Address::Client,
to: Address::Node(node.id()),
term: 0,
event: Event::ClientRequest{id: id.clone(), request},
};
node = node.step(msg)?;
requests.insert(id, response_tx);
}
|
Leader
在toydb中,只读请求会通过ReadIndex来优化,因此不会创建日志。
调用了step()之后会再调用到Leader.step(),在这其中会完成对Message::ClientRequest的处理,这里的request类型为request::Query,因此Leader就会先向状态机发送一条Instruction::Query,让状态机先记录这一次只读请求,之后再发送一条Instruction::Vote,表示Leader对此次的只读请求投票,让状态机记录。
同时,Leader会发送一次heartbeat,请求其他节点也对其投票。
 1
 2
 3
 4
 5
 6
 7
 8
 9
10
11
12
13
14
15
16
17
| Event::ClientRequest { id, request: Request::Query(command) } => {
let (commit_index, _) = self.log.get_commit_index();
self.state_tx.send(Instruction::Query {
id,
address: msg.from,
command,
term: self.term,
index: commit_index,
quorum: self.quorum(),
})?;
self.state_tx.send(Instruction::Vote {
term: self.term,
index: commit_index,
address: Address::Node(self.id),
})?;
self.heartbeat()?;
}
|
Follower
Follower在接收到了Leader发送的Message::Heartbeat之后,首先会根据Leader的进度和自身拥有的日志来更新commit进度,回应Leader一条Message::ConfirmLeader,表示接收到了Leader的心跳信息。
 1
 2
 3
 4
 5
 6
 7
 8
 9
10
11
12
13
14
15
16
17
18
19
20
| Event::Heartbeat { commit_index, commit_term } => {
// Check that the heartbeat is from our leader.
let from = msg.from.unwrap();
match self.role.leader {
Some(leader) => assert_eq!(from, leader, "Multiple leaders in term"),
None => self = self.become_follower(Some(from), msg.term)?,
}
// Advance commit index and apply entries if possible.
let has_committed = self.log.has(commit_index, commit_term)?;
let (old_commit_index, _) = self.log.get_commit_index();
if has_committed && commit_index > old_commit_index {
self.log.commit(commit_index)?;
let mut scan = self.log.scan((old_commit_index + 1)..=commit_index)?;
while let Some(entry) = scan.next().transpose()? {
self.state_tx.send(Instruction::Apply { entry })?;
}
}
self.send(msg.from, Event::ConfirmLeader { commit_index, has_committed })?;
}
|
Leader
Leader在接收到Follower响应的Message::ConfirmLeader之后,Leader再将Follower的commit进度封装成一条Instruction::Vote发送给状态机。此外,如果follower发现自身进度落后于Leader,此时Leader还会向Follower去发送Log,补齐进度。
 1
 2
 3
 4
 5
 6
 7
 8
 9
10
11
12
13
14
15
| // A follower received one of our heartbeats and confirms that we
// are its leader. If it doesn't have the commit index in its local
// log, replicate the log to it.
Event::ConfirmLeader { commit_index, has_committed } => {
let from = msg.from.unwrap();
// 与上层状态机进行交互
self.state_tx.send(Instruction::Vote {
term: msg.term,
index: commit_index,
address: msg.from,
})?;
if !has_committed {
self.send_log(from)?;
}
}
|
状态机
状态机是通过Driver.drive()来驱动的,在其中不断处理由下层Raft模块的发送而来的Instruction执行,状态机这一部分是和上一部分同时执行的。
对于上面发送而来的Instruction::Query,状态机会将其记录,而发送而来的Instrcution::Vote,会先调用self.query_vote(),然后调用self.query_execute()
- 在
self.query_vote()中,简单记录投票 - 在
self.query_execute()中,会遍历还未执行的,并且index <= last_apply_index的所有请求,获取出当前的投票数,如果达到了quorum,就交给状态机的实现去执行,然后向Leader发送一条Message::ClientResponse,告知Leader状态机已经执行结束。
 1
 2
 3
 4
 5
 6
 7
 8
 9
10
11
12
13
14
15
16
17
18
19
20
21
22
23
24
25
26
27
| /// Votes for queries up to and including a given commit index for a term by an address.
fn query_vote(&mut self, term: Term, commit_index: Index, address: Address) {
for (_, queries) in self.queries.range_mut(..=commit_index) {
for (_, query) in queries.iter_mut() {
if term >= query.term {
query.votes.insert(address);
}
}
}
}
/// Executes any queries that are ready.
fn query_execute(&mut self, state: &mut dyn State) -> Result<()> {
for query in self.query_ready(state.get_applied_index()) {
debug!("Executing query {:?}", query.command);
let result = state.query(query.command);
if let Err(error @ Error::Internal(_)) = result {
return Err(error);
}
self.send(
query.address,
Event::ClientResponse { id: query.id, response: result.map(Response::Query) },
)?
}
Ok(())
}
|
单机存储
在state.query()中,就会找到状态机的实现,而状态机的实现是一个MVCC的Wrapper,在query当中,根据请求类型进行分类,恢复当前事务的状态,然后会调用到
Transaction<storage::engine::Engine>.read_table(),在这里,终于脱离了分布式的部分,转为单机执行了。构建一个table.name的key去存储引擎中查询:
 1
 2
 3
 4
 5
 6
 7
 8
 9
10
11
12
13
14
| // 状态机中的query
fn query(&self, command: Vec<u8>) -> Result<Vec<u8>> {
match bincode::deserialize(&command)? {
// ...
Query::ReadTable { txn, table } => {
bincode::serialize(&self.engine.resume(txn)?.read_table(&table)?)
}
// ...
}
}
// 单机存储引擎的读取操作
fn read_table(&self, table: &str) -> Result<Option<Table>> {
self.txn.get(&Key::Table(table.into()).encode()?)?.map(|v| deserialize(&v)).transpose()
}
|
再往下走就是MVCC了,MVCC又封装了storage trait(Bitcask或者Memory),MVCC调用了storage 的scan,对以user_key为前缀的key进行扫描,找到对当前事务能见的版本,从磁盘中读取到数据,完成了执行,剩下的就是返回结果了
 1
 2
 3
 4
 5
 6
 7
 8
 9
10
11
12
13
14
15
16
17
18
19
| // MVCC
pub fn get(&self, key: &[u8]) -> Result<Option<Vec<u8>>> {
let mut session = self.engine.lock()?;
let from = Key::Version(key.into(), 0).encode()?;
let to = Key::Version(key.into(), self.st.version).encode()?;
let mut scan = session.scan(from..=to).rev();
while let Some((key, value)) = scan.next().transpose()? {
match Key::decode(&key)? {
Key::Version(_, version) => {
if self.st.is_visible(version) {
return bincode::deserialize(&value);
}
}
key => return Err(Error::Internal(format!("Expected Key::Version got {:?}", key))),
};
}
Ok(None)
}
|
Leader回应
当单机存储执行完,并且状态机也向Leader发送了Message::ClientResponse之后,Leader就会将Message::ClientResponse通过接收请求时一同接受的oneshot channel的发送端,响应给Client,Client接收到响应,完成执行,继续Executor的执行。
 1
 2
 3
 4
 5
 6
 7
 8
 9
10
11
12
13
14
15
16
17
18
19
20
21
22
| Event::ClientResponse { id, mut response } => {
if let Ok(Response::Status(ref mut status)) = response {
status.server = self.id;
}
self.send(Address::Client, Event::ClientResponse { id, response })?;
}
Some(msg) = node_rx.next() => {
match msg {
Message{to: Address::Node(_), ..} => tcp_tx.send(msg)?,
Message{to: Address::Broadcast, ..} => tcp_tx.send(msg)?,
// 响应Raft Client
Message{to: Address::Client, event: Event::ClientResponse{ id, response }, ..} => {
if let Some(response_tx) = requests.remove(&id) {
response_tx
.send(response)
.map_err(|e| Error::Internal(format!("Failed to send response {:?}", e)))?;
}
}
_ => return Err(Error::Internal(format!("Unexpected message {:?}", msg))),
}
}
|
Write#
再后面,会调用txn.create发送写请求,大致逻辑和流程都是一样的,只不过由于是写请求,需要通过日志来进行共识(读请求的ReadIndex优化可以不创建日志),在Raft行为和与状态机上的交互会略有不同,但是整体上是一致的,这里只简单写一下不同的部分,读者可以按照这个流程,去自行分析。
Leader
在Leader.step()中,如果是Request::Mutate类型的请求,就会调用propose()来创建日志并向Follower去发送日志。并且向状态机中发送一条Instruction::Notify类型的信息,用于记录一次写请求的开始:
Follower
Follower接收到的为Message::AppendEntries,Follower会根据自身的情况,决定是拒绝还是将日志追加到自身,同时响应Leader。
Leader
Leader接收到Follower响应的Message::AcceptEntries时,就会计算是否有日志在大多数节点上达到了大多数,尝试进行commit与apply,如果达到了大多数就会更新commit_index,并且向状态机发送commit了的log entry。
状态机
状态机拿到了commit了的log entry,首先会通过状态机的实现(KV Engine)去执行该条日志,日志被执行会导致last_applied_index被更新,从而一些读请求也有可能达到执行的条件,因此调用self.query_execute()来执行读请求。
最后移除请求记录,通知Leader已经执行完成。
Leader
Leader将由状态机发送而来的ClientResponse经过几次channel通信,转发给Client。回到Executor中继续执行。
至此,toydb的源码分析已经全部结束。起初开这个系列的主要原因是自己想尝试使用Rust作为毕业设计的技术栈,用来恶补一下自己的Rust。就目前而言感觉是可以用Rust写下来的,不至于中途逃跑到c++去。
toydb代码规模很小,并且结构很完善,可以作为一个很好的分布式数据库的学习项目,较为直观的展示了如何将SQL、分布式、存储引擎相结合,以及如何使用kv存储引擎来构建关系模型,这也是像Bustub,Miniob没有能够做到的(二者均是heap file)。
toydb作为一个学习项目,性能不是很好,后续如果有时间的话,可能考虑再补一期toydb的性能分析的文章,如果懒或者没时间的话就摸了。
后续一段时间内估计应该是不会再更新这种源码阅读类型的文章了,大概会发一些看过的paper。如果后面毕设写的比较有意思的话,也会考虑把毕设给分享出来。
最后,希望该系列文章能够对想学习Rust和入门分布式数据库的读者有所帮助,笔者水平有限,如果出现错误,也希望读者能够进行批评指正。


 Insert时需要首先读取到对应的Table,这里就会调用SQL Engine的